

Training at home can be a practical way to work on your hockey conditioning when you don’t have access to a rink or gym.
This article will show you how to set up an at-home hockey conditioning circuit, with both bodyweight-only and home-gym examples.
Understanding Balanced Program Design
When training the body for elite hockey performance, balance is critical to create a high-level training program.
I do not mean balance in the sense that we are training you to remain stable on an unstable surface.
Instead, I am discussing balance in the context that you need to train all areas of the body and not overemphasize any certain area (thus, creating a structural imbalance).
Total body balanced musculature allows the body to:
- Reach its force production limit
- Remain injury-free throughout high-velocity movement
If your programming isn’t balanced in the correct way for hockey, your body will have what I refer to as “dormant strength.”
I call it dormant because your body will automatically decrease the amount of force a given muscle group can contribute to a movement to protect itself because the equal and opposite muscle group cannot effectively (and safely) decelerate you.
For example, let’s say your legs are extremely strong and powerful, but you don’t have the core strength/stiffness to be able to properly absorb and redirect the force production that your legs are creating.
If this is the case, your body will automatically decrease the amount of force your legs can produce to protect your pelvis and spine because your core isn’t strong/stable enough to stabilize if you let your legs contract at 100% of your capability.
This is where the “dormant” part of my explanation comes into play.
In the above example, your legs had the potential to be more explosive, but since your core couldn’t handle those forces, your nervous system shutdown force production from your legs to protect you from getting injured.
This creates a scenario where a hockey player might continuously train his/her legs because they think that’s the key to getting faster.
Yet, they have no idea that their legs already have plenty of dormant strength to unleash if they were to just focus on balancing their program design with more core work.
Balanced programming leads to higher force outputs (think faster skating, harder shooting, etc.) because ALL areas of the body are well put together.
At the same time, due to this force-absorption ability from a properly balanced program, you dramatically reduce the risk of injury because all of your muscle structures can handle each other’s output.
Enter: The Serape Effect
The serape effect represents a core training model founded in the 1970s that includes both the anterior and posterior core muscles.

These two were well ahead of their time creating this because it’s something that is still very much under-discussed and poorly understood today.
This is something all hockey coaches should have a firm grip on because it points out how movement is both an accelerative and decelerative process.
For example, if I am right-handed and I am taking a slapshot, I am going to accelerate with my right serratus anterior, right external oblique, left internal oblique, left hip flexor, and left adductor.
But, I will never reach my potential for shot power unless I balance that out with decelerative strength in the right lat, left glute, and left hamstring.
I get into concepts like this much deeper within my Hockey Training Specialist course, but I think you’re getting the bigger picture here.
Unless you balance out your accelerators with your decelerators within your off-season hockey training programming, then you will never unlock your dormant strength, speed, conditioning, or agility that you never knew you had within you.
Creating At-Home Hockey Training Circuits
Although the science behind this topic runs very deep, its application within creating an at-home conditioning circuit is straightforward in both creation and application.
You can balance the accelerators and decelerators of your entire body by thinking of it just like an octagon.
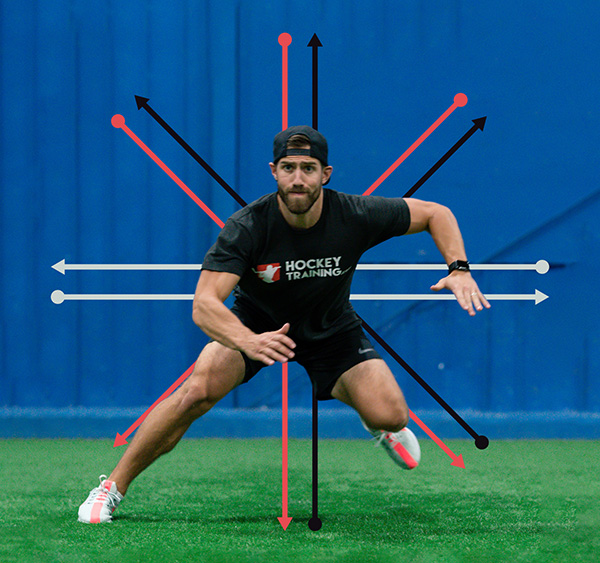
By loading the body in the direction of all eight movement patterns, you are creating cross-body accelerative/decelerative balance in an easy to understand way.
The best part?
Understanding that means you now know precisely how you’re going to set up your at-home hockey training conditioning circuit.
Choose eight exercises that cover the eight different planes of motion you see in the above diagram and alternate them from a “front of the body” exercise to a “back of the body” exercise for optimal balance.
The template would look like this:
- Vertical loading – Front of the body
- Vertical loading – Back of the body
- Diagonal loading – Front of the body
- Diagonal loading – Back of the body
- Horizontal loading – Horizontal rotation movement
- Horizontal loading – Anti-rotation movement
- Diagonal loading – Front of the body
- Diagonal loading – Back of the body
*Perform each exercise for 10-15 reps with minimal rest in between exercises and 1-2 minutes rest between circuits. Repeat for 3-5 rounds.
Bodyweight-Only At-Home Hockey Conditioning Circuit
Prisoner Squats x 20
BW Overhead Good Mornings x 20
Single-Leg Opposite Side Reaches (Right Foot Only) x 20
Push Up Bird Dogs (Right Side Only) x 20
T Rolls x 20
Renegade Row x 20
Single-Leg Opposite Side Reaches (Left Foot Only) x 20
Push Up Bird Dogs (Left Side Only) x 20
*Perform each exercise for 20 reps with minimal rest in between exercises and 1-2 minutes rest between circuits. Repeat for 5 rounds.
Home Gym Hockey Conditioning Circuit
DB Goblet Squat x 20
DB Romanian Deadlift x 20
Medicine Ball Diagonal Chops (Right Side High-To-Low) x 20
T-Stands (Right Side Only) x 20
Medicine Ball Horizontal Chops x 20
Dead Bug x 20
Medicine Ball Diagonal Chops (Left Side High-To-Low) x 20
T-Stands (Left Side Only) x 20
*Perform each exercise for 20 reps with minimal rest in between exercises and 1-2 minutes rest between circuits. Repeat for 5 rounds.
For more session ideas, see our 15 best hockey workouts. Choose options that fit your training experience, available equipment, and recovery, rather than adding extra circuits on top of your current plan.
Finding Your At-Home Hockey Training Plan
The above information can be utilized to help you design and create various hockey conditioning workouts that center their importance around complete core development through understanding the serape effect.
If you want a structured plan beyond these conditioning circuits, use our hockey training program finder to explore the current options for your age and goals. Check the equipment requirements and schedule before choosing a plan.
Final Thoughts
This article gives you a framework for building hockey conditioning circuits at home and putting your training knowledge into practice.
Although “knowledge is power” is the most popular saying, I like to revise it by telling those who read my blog that only applied knowledge is power.
Knowledge means nothing without application, give the above workouts a try and let’s crush this off-season!
Look to read more about hockey-specific bodyweight training? Check out our At Home Hockey Workouts article.
Leave a Reply